Hier aus einem Flyer zur HDC 5 Karte
Beiträge von fritzeflink
-
-
Kurze Ergänzung:
djanich hatte eine 20MB Festplatte angeschlossen - was man damals wohl so hatte.

-
Anbei dann auch noch ein 'schönes' Bild von der HDC5 Karte und glücklicherweise ist die HDC5 auch in der Geräteliste vom J&K CP/M3 enthalten.
-
Aktuell habe ich die J&K / MKC Karten von SBC hier und suche die Dokumentation zum HDC5 Festplattenkontroller.
Zum Festplattenkontroller HDC5 habe ich keinerlei Dokumentation, schaut doch mal bitte in Eurem Archiv nach ob ihr was findet. Der im HDC5 fehlende Baustein ist ein 74ls393n und ist im Zulauf.
Laut Info von djanich wußte bei MKC wohl nur Lutz Kleberhoff Bescheid der den HDC5 auch entwickelt hat. Leider ist er schon vor einigen Jahren gestorben.Ziel ist:
1. EPC mit ZDOS auf 40/80 Track einzurichten.
2. System 2 (CPU2-256, FDC2 und HDC5 mit Harddisk und J&K CP/M+ zu generieren. Testweise mit echter Festplatte und dann auch mit dem MFM EMU.
-


Dann hilft auch kein Händewaschen.
Handschuhe
-
-
Anbei nun die entgültigen Versionen:
-
SBC hat mir das Servicemanual zugeschickt.
Wie bei NCR bekannt sind die Handbücher in der Größe von ca. A5 - die Zeichnungen leider nicht wesentlich größer.
Da die Seiten Kopien sind - doppelseitig auf A4 - sind auch die die Zeichnungen nicht gut leserlich, aber besser als nichts.
Gescannt habe ich sogut wie möglich in 600dpi - Graustufe.Hier vorab mal 2 PDFs.
-

Aufgenommen habe ich die Diskette mit eine Genie 1 und dem Controller im Laufwerksgehäuse
Diese Information gehört in den 1. Post.
Dann bekommst du jetzt noch den Link zu EACA und TCS und eine Geräteübersicht mit Beispielen.
-
-
TCS Genie IIIs wurde in Kleinanzeigen wohl verkauft. Wer hat den jetzt?

-
Ich gehe davon aus das du mit NEWDOS,oder GDOS arbeitest.
PDRIVE definiert die Diskettenformate unter NEWDOS, mit FORMAT werden die Disketten formatiert.
Mit PD 0 werden die Formatdefinitionen welche in drive 0: vorgegeben sind angezeigt.
Mit PDRIVE x,y,z.... werden die Formate eingestellt. GDOS (PD) hat leider eingedeutschte Parameter, die Funktionalität ist aber gleich.
Das mal so in Kürze.
COPY 0 1 macht eine Komplettkopie von 0: nach 1: mit Formatierung - siehe auch Handbuch.
-
The headline was 'Neue Software zum NCR Decision Mate V (DM-V)' but I'll answer your questions and may change the headline to 'Neue Software und Fragen zum NCR Decision Mate V (DM-V' (New software and questions...)
As you have the DM-V with internal harddisk there is a youtube series with 8 videos from Jerry Walker repairing a DM-V with WD1001 HD controller. He got a controller replacement from me and his lesson about the microcontroller in the WD1001 is very interesting.
For the DM-V there is the Extendet Test programm for CP/M80 which can test the complete hardware.
-
Thanks for your info.
Flash951 As the content of oldcomputers is older please download the NCR-DMV.ZIP (1,8GB) to get all informations.
-
Hi, there are a lot of questions and I read them just a minute ago.
A lot of information are collected at oldcomputers-ddns.org. There you will find most answers but a lot is in German language of course.
The DM-V will boot from HD for MSDOS - I haven't booting if from HD with the other available operating systems.
Here in the forum are even other DM-V users and I hope they will answer your questions too but weather is nice outside today.So it's interesting where you live and if you even have taken a look at vcfed and if you are there what is your name at VCFED ?
This will help us finding the best answers for your questions.The DM-V will work with the WD1001 and the WD1002 hd controller for internal and external adapter. Please take some time and take a look at oldcomputers for information's.
As a DM-V without keyboard is a bad situation I'm very interested in your work to connect an alternate for the missing keyboard.And please show us some pictures and even one from the manufactor label on the backside of your DM-V.
A - at vcfed I see you have a DM-V from norway - nice.

Question: Will File Commander also be ported to DMV MSDOS 2.11
I don't believe so as the original is written for CP/M on robotron systems.
With MSDOS I use nsweep as it is like the CP/M version. Best working is with US-keyboard as the german ÜÄÖß are not nice.
Of course a File Commander for MSDOS would be nicer than nsweep but I have the keys in my fingers.nsweep is available for MSDOS, CP/M80 and CP/M86.
-
The MSDOS can use a 20MB hard disk - on CP/M you will got a bad directory as the DPB from CP/M will not be correct for the 20MB. For MSDOS you have to format the 20MB hd with fmt20.com.
I used the WD1001 and WD1002 controller. The WD1002 works best with the MFMEMU . Sadly the WD1001 didn't work full as
you can use a image made with WD1002 but formatting it gave errors. There seems some timing differences - maybe someone can got a corrective from David. I tried this years ago but my system brake and I did stop the communication. -
The DMV 10Mb mfm hard drive seems to only work with MSDOS.
Which HD controller do you have?
The MFM HD works with all operatingsystems.
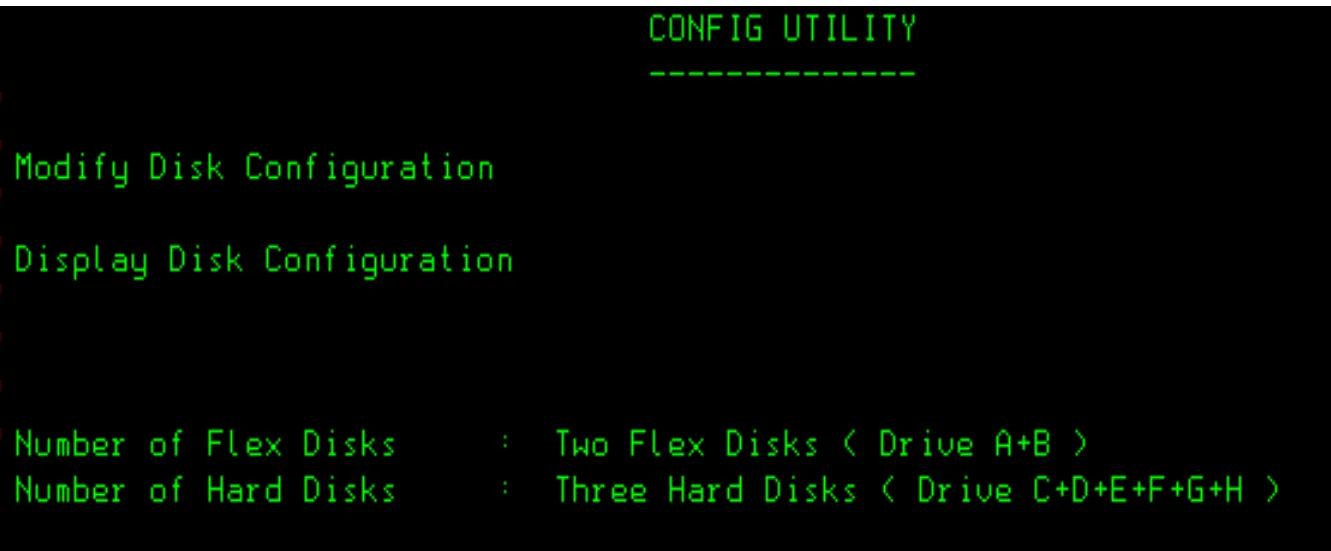
In CP/M80 and 86 and 68k you have to use CONFIG to setup the system. The picture is from CP/M80.
To format the HD there is the programm DISCITxx available.
-
Falls du möchtest kannst du mir die deiner Meinung nach zu scannenden Dokumente gene zusenden.
So hätte ich das dann auch reproduzierbar im Archiv. -
Danke für die Info.

Zum DM-V findst du HIER diverses. Das Service Manual scheint ähnlich dem Technical Manual zu sein.
Schau dir bitte mal die Manuals an, es lohnt sich auch andere Ausgabestände zu archivieren - oder auch welche in besserem Zustand.
-
Verstehe ich das richtig, das ist eine Liste der Hardware und Software mit ehemaligen DM Preisen? Aber keine Disketten images oder so?
Richtig, ich hoffe aber auf weitere positive Antworten hier im Forum.
Das große historische Computerarchiv (15.000 Seiten) über
Computerhersteller, Computermodelle & Computerpreise
Deutschland 1971-2001 -
-
-
Schönes Gerät
, leider zerlegt sich das Tatstaturkabel wie es auch an anderen Systemen öfter zu sehen ist. -

Screenshot "Vermutlich Beginn PCPM86" - Ich glaub, da bist du schon drüber..
Ja. das ist eher dort - ist aber auch schon etwas spät.
-
Jetzt muss ich da mal mit PCEMU probieren.
-
Mit einem Image und PCEM könntest du bstimmt gefahrlos weitermachen.
-
Mach dich ruhig lustig - am Ende hat es ja geklappt!
Gut, ich wollte mich nicht lustig machen - womöglich bin ich aber auch zu alt für heutige Kommunikationsweisen.
Ein Image mit dd auf einer Linuxkiste wäre angebracht. Sowas läuft problemlos auf einem Socket 7 system.
Falls du so etwas nicht zur Verfügung hast - besorgen und so lange die HD in Ruhe lassen. -
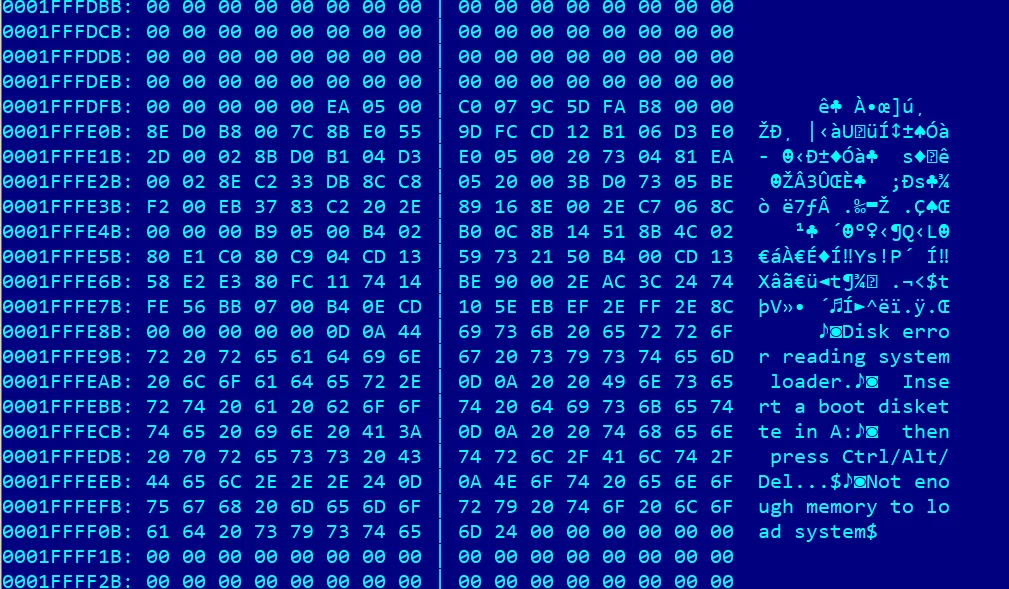
Mit Hilfe von ChatGPT hab ich die DOS-Partition wiederhergestellt
ach nein, Ich schreib mal besser nichts.
-
Danke, R513 war schon mal gut. Ein wenig ist das Bild in der Horizontalen gestaucht - das werde ich morgen mal hoffentlich beheben können. Glücklicherweise habe ich mein altes Trimmerbesteck - interessant dass die gleiche Aktion letztens keinen Erfolg gebracht.
-
TRS80? Video Genie? Hier den Bildschirm mit "Punkten" weiß füllen?
Werde ich morgen mal machen - mit mbasic unter CP/M am Prof181X und dann auf die Genie 3s floppy kopieren. Mal schauen wie es aussieht.
Ich könnte es auch unter SDLSTRS erstellen und das DMK Image auf Diskette schreiben.
Am Genie 3s.
Nach dem Booten mit GDOS.